National Symbols of India | ||||
|
"Jana-gana-mana-adhinaayaka, jaya he
Bhaarata-bhagya-vidhaataa Punjab-Sindhu-Gujarata-Marathaa Draavida-Utkala -Banga Vindhya-Himachala-Yamuna-Gangaa Uchchala-Jaladhi-taranga Tava shubha naame jaage Tava shubha ashisha maange Gaaye tab jaya gaatha Jana-gana-mangala-daayaka jaya he Bharata-bhagya-vidhataa Jaya he, jaya he, jaya he Jaya jaya, jaya, jaya he!! " 
Tiger (Panthera Tigris, Linnaeus) is the national animal of India. Tiger is also called the lord of Jungles. As the national animal of India, tiger symbolizes India's wildlife wealth. The rare combination of grace, strength, agility and enormous power has earned the tiger great respect and high esteem. India is home to nearly half of the total population of tigers. The government of India launched the Project Tiger in 1973 to protect the royal animal.
Out of the eight races of the tiger, the Indian race, the Royal Bengal Tiger is found almost all over country (with the exception of the north-western region). With the launch of Project tiger in 1973, the tiger population showed a gradual increase and the census of 1993 puts the tiger population of the country at 3,750. Under Project tiger 23 tiger reserves have been established throughout the country, covering an area of 33,406 sq. km. Unfortunately due to negligence of authorities and poaching the tiger population of India is decreasing at an alarming rate. In fact, some of the tiger reserves do not have any tigers at all. 
Peacock (Pavo cristatus), which is a symbol of grace, joy, beauty and love is the national bird of India. Peacock occupies a respectable position in Indian culture and is protected not only by religious sentiments but also by parliamentary statute. The Indian peacock is a colorful, swan-sized bird with a fan-shaped crest of feathers on its head, a white patch under the eye and a long-slender neck. The male peacock is more colorful than the female one.
 National Calendar National Calendar
he national calendar of India is based on the Saka Era with Chaitra as its first month and a normal year of 365 days. The national calendar of India was adopted on March 22nd 1957. Dates of the Indian national calendar have a permanent correspondence with the Gregorian calendar dates- 1 Chaitra falling on 22 March normally and on 21 March in leap year.
|

Wednesday, 2 May 2012

Monday, 23 April 2012
OpenERP Barcode Generate
Use Barcode in OpenERP report.
paste the folowing code in .rml file instead of barcode
<barCode code="code128" quiet="9" fontName="Times-Roman" fontSize="50" alignment="CENTER"> [[ tracking_ids.serial or '' ]] </barCode>
paste the folowing code in .rml file instead of barcode
<barCode code="code128" quiet="9" fontName="Times-Roman" fontSize="50" alignment="CENTER"> [[ tracking_ids.serial or '' ]] </barCode>
Friday, 20 April 2012
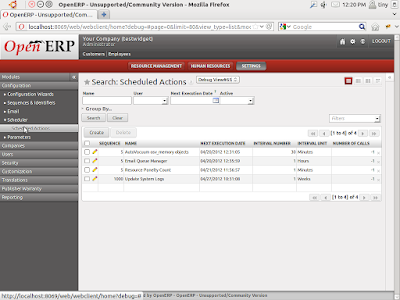
How to create Scheduler in OpenERP
How to create Scheduler in OpenERP . ( ir.cron )
Nayi Pinakin
Trainee OpenERP ,
Gandhinagar . (Jan 2012 )
nayi_pinakin@yahoo.in
Here are Steps you have to follow :
Step 1 :
In view file simply write as under
<record model="ir.cron" id="resource_panelty_cron">
<field name="name">Resource Panelty Count</field>
<field name="interval_number">1</field>
<field name="interval_type">minute</field>
<field name="numbercall">-1</field>
<field eval="False" name="doall"/>
<field eval="'lib.register'" name="model"/>
<field eval="'compute_penalty'" name="function"/> # call the function in .py file
<field eval="'()'" name="args"/>
</record>
Step 2 :
you can also directly create your Scheduler :
like ,
1. First you simply go setting - > configuration -> scheduler -> scheduler_action


Description :
Nayi Pinakin
Trainee OpenERP ,
Gandhinagar . (Jan 2012 )
nayi_pinakin@yahoo.in
Here are Steps you have to follow :
Step 1 :
In view file simply write as under
<record model="ir.cron" id="resource_panelty_cron">
<field name="name">Resource Panelty Count</field>
<field name="interval_number">1</field>
<field name="interval_type">minute</field>
<field name="numbercall">-1</field>
<field eval="False" name="doall"/>
<field eval="'lib.register'" name="model"/>
<field eval="'compute_penalty'" name="function"/> # call the function in .py file
<field eval="'()'" name="args"/>
</record>
Step 2 :
you can also directly create your Scheduler :
like ,
1. First you simply go setting - > configuration -> scheduler -> scheduler_action

2. Now create new Scheduler here interval number and interval unit important

3. Now , in object simply write your table name and in Method write your .py file method
which you want to call at every repeated time.

Description :
"scheduler_id" : is a unique xml record id
"scheduler_name" : any desirable name
"active" : True or False determines whether the scheduler is active or not..
"user_id" : refers the user who owns the scheduler
"interval_number" : number of times the scheduler is to be called based on the "interval_type"
"interval_type" : it can be days, hours, minututes etc
"interval_type" : it can be days, hours, minututes etc
"numbercall" : Number of time the function is called. negative number indicates no limit
"doall" : booelan field. A 'True' enables it to execute missed occurences as soon as the server is restarts
"model" : Name of object whose function will be called when this scheduler will run. e.g. 'res.partener'
"model" : Name of object whose function will be called when this scheduler will run. e.g. 'res.partener'
"function" : Name of the method to be called on the object when this scheduler is executed.
"args" : Arguments to be passed to the method. e.g. (uid,)
Thursday, 19 April 2012
How to Add custom Widget in your open ERP module
How to Add custom Widget in your open ERP module ..
Here are steps :
By : Pinakin Nayi
Trainee OpenERP,
Gandhinagar.
E-mail : nayi_pinakin@yahoo.in
Step 1 :
create a folder
--> static
--> src
-->js
->lib.js
--> xml
-> lib.xml
--> css
-> .css
Step 2 :
Register your xml file in __openerp__.py
Like this
'css': [ 'static/src/css/resource.css' ],
'js': [ 'static/src/js/lib.js' ],
'qweb' : [ 'static/src/xml/lib.xml', ],
Step 3 :
In "lib.xml" create your template
like ,
<templates id="template" xml:space="preserve">
<t t-name="link">
<div>manage your template </div>
</t>
</templates>
Step 4 :
In "lib.js" create your template
like ,
openerp.lib = function(instance)
{
console.log('tTTT',instance)
instance.web.form.widgets.add('link', 'openerp.lib.Mywidget');
instance.lib.Mywidget = instance.web.form.Widget.extend( {
template : 'link',
init : function(arg)
{
console.log('initi....my custome widget');
}
})
}
Step 5 :
In this test i have only write "manage your template" instread of that you can
write your own template to implement ..
Step 6 :
Now , your Widget is ready ,
you have to implement this in your tag.
<field name="description" colspan="4" widget="link" />
OpenERP Create Web Module
OpenERP Create Web Module
By : Pinakin NayiTrainee OpenERP (Jan 2012) ,
Gandhinagar .
nayi_pinakin@yahoo.in
Hello ,
You all are going to search "OpenERP Web Module". I hope this will helpful to you.
OpenERP Web Module.
--> To build web module you have to create a module at server addons.
--> You need to first create
__init__.py and
__openerp__.py file similar as server addons.
Where
__openerp__.py have more parameters likes
{
“name”: “lib_resource”,
“category” : “Hidden”,
“description”:’Openerp web Library’,
“version”: “2.0″,
“depends”: ['web','project'],
‘qweb’ : ['static/src/xml/lib.xml'],
“css”: [],
“js”: ['static/src/js/lib.js'],
“auto_install”: True
}
--> As you see in above code. how to add your css and js and qweb templates.
Inside your module need to manage folder structure.
lib_resource/static/src/xml -> Files related to qweb templates
lib_resourcer/static/src/js -> Files related to javascript which you create or code.
lib_resource/static/lib -> Put your javascript related libs and js plugins….
__openerp__.py
__init__.py
*--> Create
lib.js file at lib_resource/static/src/js.
Note : Now most important rule to remember. inside lib.js you need to create openerp new namespace lib_resource.
openerp.lib_resource = function(openerp)
{
var myTemplate = ’link’, // template for qweb rendering … we can manage it as per our requirement.
Here you can create new function or global variables.
Also if you want to modify or inherit any existing class or libs the here you can manage that.
Here you can inherit any existing class and modify its operation and also able to create new classes…
}
--> lib.xml [ at ] lib_resource/static/src/xml
This file holds information regarding qweb template’s.
What is qweb???
when we try to load the page then templates render on qweb.js and qweb2.js
these 2 files are containing all the information well i also do not know deeply about this because we have never try to know that thing.
meanly it is used for loading the templates for different views
example :
<?xml version=”1.0″ encoding=”UTF-8″?>
<templates id=”link1” xml:space=”preserve”>
<t t-name=”link”>
<div>………………… manage your template…………… </div>
</t>
</templates>
--> OpenERP Web Module { Level 2 } :
If you want to create new widget for form.
openerp.lib = function(openerp)
{
openerp.web.form.<class name> = openerp.web.form.<class name>.extend({
….. manage your code …..
});
}
For getting more grips on it review all most web addons in side server addons folders.
Note : ( Remember )
OpenERP have main important files are located at :
-->addons/web/static/src/js :-
Here all js are main core js and on this other openerp javascript depended.
boot.js, core.js, crome.js and data.js files are the heart of openerp framework.
Where view_form.js, view_page.js and view_list.js are also most important to render list view and form views.
Also all other files in this same directory are most important files.
OpenERP have user jqeury differed all most in code. So need to grip on it too.
addons/web/static/src/xml :- base.xml
------>>>>
This file hold all most all presentation view related templates.
Monday, 16 April 2012
Test Cases in OpenERP
-
Check that Resource is in "draft" state.
-
!assert {model: lib.register, id: register_001,string: Resource should be Available.}:
- state == 'draft'
-
I want to issue one book.
-
!python {model: lib.register}: |
self.registration_confirm(cr, uid, [ref("register_001")])
-
I Check that Resource is "Issued"
-
!assert {model: lib.register, id: register_001, string: Resource should be issued}:
- state == 'issue'
-
Return time, I close this Resource.
-
!python {model: lib.register}: |
self.button_reg_close(cr, uid, [ref("register_001")])
-
Check that resource is in "close" state.
-
!assert {model: lib.register, id: register_001, string: Resource should be Closed}:
- state == 'close'
Tuesday, 10 April 2012
How to Generate Report in OpenERP
Generate Report : Tiny ERP Gandhinagar...
By : Year – 2012 Trainee at Tiny ERP
Pinakin Nayi ( nayi_pinakin@yahoo.in )
step 1 :
→ open open-office.org
→ tools menu
→ extension manager
→ go to - base_report_designer
→ plugin →openerp_report_designer.zip
step 2 :
→ restart open-office
step 3 :
→ open a new report
→ add a loop ( select your DB)
→ add loop as a repeat
→ add a field and make it customize look
→ save file as a .sxw or send to the server
step 4 :
→ convert .sxw to .rml
→ $> cd to base-report-designer/openerp_sxw2rml > python openerp_sxw2rml.py
../../exam/report/.sxw > ../../exam/report/.rml
step 5 :
→ ( in report folder )
→ exam.py or copy it from (http://doc.openerp.com/v6.0/developer/3_11_reports/11_1_openoffice_report.html)
import time
from report import report_sxw
class exam(report_sxw.rml_parse):
def __init__(self, cr, uid, name, context):
super(exam, self).__init__(cr, uid, name, context)
self.localcontext.update({
'time': time,
})
report_sxw.report_sxw('report.exam.student', 'exam.student',
'addons/exam/report/exam.rml', parser=exam, header=True)
→ (exam.py , exam.rml , exam.sxw , __init__.py )
→ __init__.py
import exam
step 6 :
( main exam folder )
→ exam_report.xml
<?xml version="1.0"?>
<openerp>
<data>
<report
id="exam_student"
string="Print Exam..."
model="exam.student"
name="exam.student"
rml="exam/report/exam.rml"
auto="False"
header="False"/>
</data>
</openerp>
→ __openerp__.py
in update → 'exam_report.xml'
→ __init__.py
import report
Subscribe to:
Posts (Atom)