Monday, 23 April 2012

OpenERP Barcode Generate

Use Barcode in OpenERP report.

paste the folowing code in .rml file instead of barcode
<barCode code="code128" quiet="9" fontName="Times-Roman" fontSize="50" alignment="CENTER"> [[ tracking_ids.serial or '' ]] </barCode>

Friday, 20 April 2012

How to create Scheduler in OpenERP

How to create Scheduler in  OpenERP . ( ir.cron )
                                                                                                        Nayi Pinakin
                                                                                                        Trainee OpenERP ,
                                                                                                        Gandhinagar . (Jan 2012 )
                                                                                                        nayi_pinakin@yahoo.in
Here are Steps you have to follow :

Step 1 :
          In view file simply write as under
          <record model="ir.cron" id="resource_panelty_cron">
            <field name="name">Resource Panelty Count</field>
            <field name="interval_number">1</field>
            <field name="interval_type">minute</field>
            <field name="numbercall">-1</field>
            <field eval="False" name="doall"/>
            <field eval="'lib.register'" name="model"/>
            <field eval="'compute_penalty'" name="function"/>  # call the function in .py file
            <field eval="'()'" name="args"/>
        </record>

Step 2 :
        you can also directly create your Scheduler :
         like ,
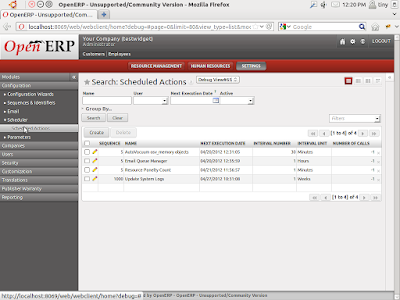
         1.       First you simply go setting - > configuration -> scheduler -> scheduler_action


      2.  Now create new Scheduler  here interval number and interval unit important


   3.  Now , in object simply write your table name and in Method write your .py file method 
        which you want to call at every repeated time.


 Description : 


"scheduler_id" : is a unique xml record id
"scheduler_name" : any desirable name
"active" :  True or False determines whether the scheduler is active or not..
"user_id" : refers the user who owns the scheduler
"interval_number" : number of times the scheduler is to be called based on the "interval_type"

"interval_type" 
: it can be days, hours, minututes etc
"numbercall" : Number of time the function is called. negative number indicates no limit
"doall" : booelan field. A 'True' enables it to execute missed occurences as soon as the server is restarts

 "model" : Name of object whose function will be called when this scheduler will run. e.g. 'res.partener'
"function" : Name of the method to be called on the object when this scheduler is executed.
 "args" : Arguments to be passed to the method. e.g. (uid,)


Thursday, 19 April 2012

How to Add custom Widget in your open ERP module

How to Add custom Widget in your open ERP module ..
 Here are steps : 
                                                        By : Pinakin Nayi
                                                               Trainee OpenERP,
                                                               Gandhinagar.
                                                               E-mail : nayi_pinakin@yahoo.in
Step 1 :
          create a folder
                   --> static
                            --> src
                                   -->js
                                        ->lib.js
                                  --> xml
                                        -> lib.xml
                                  --> css
                                        -> .css

Step 2 :
          Register your xml file in __openerp__.py
          Like this
                      'css': [ 'static/src/css/resource.css' ],
                      'js': [  'static/src/js/lib.js' ],
                       'qweb' : [ 'static/src/xml/lib.xml', ],

Step 3 : 
        In  "lib.xml"  create your template
           like ,
                    <templates id="template" xml:space="preserve">
                     <t t-name="link">
                      <div>manage your template  </div>
                    </t>
                  </templates>

Step 4 :
      In  "lib.js"  create your template
           like ,

                      openerp.lib = function(instance)
                     {
                       console.log('tTTT',instance)
                       instance.web.form.widgets.add('link', 'openerp.lib.Mywidget');
                       instance.lib.Mywidget = instance.web.form.Widget.extend( {
                              template : 'link',
                              init : function(arg)
                                             {
                              console.log('initi....my custome widget');
                              }
                      })
                  }

Step 5 : 
       In this test i have only write "manage your template" instread of that you can
      write your own template to implement ..

Step 6 : 
         Now , your Widget is ready ,
         you have to implement this in your tag.

        <field name="description" colspan="4" widget="link" />


OpenERP Create Web Module


OpenERP Create Web Module

                                                                    By : Pinakin Nayi
                                                                           Trainee OpenERP (Jan 2012) ,
                                                                           Gandhinagar .
                                                                           nayi_pinakin@yahoo.in


Hello ,
        You all are going to search "OpenERP Web Module". I hope this will helpful to you.
OpenERP Web Module.

--> To build web module you have to create a module at server addons.

--> You need to first create
                  __init__.py and
                  __openerp__.py file similar as server addons.
Where
 __openerp__.py have more parameters likes
{

“name”: “lib_resource”,
“category” : “Hidden”,
“description”:’Openerp web Library’,
“version”: “2.0″,

“depends”: ['web','project'],
qweb’ : ['static/src/xml/lib.xml'],
“css”: [],
“js”: ['static/src/js/lib.js'],
“auto_install”: True
}

--> As you see in above code. how to add your css and js and qweb templates.

        Inside your module need to manage folder structure.
       
        lib_resource/static/src/xml   ->  Files related to qweb templates
       
        lib_resourcer/static/src/js     ->  Files related to javascript which you create or code.
       
        lib_resource/static/lib          ->  Put your javascript related libs and js plugins….

__openerp__.py
__init__.py

*--> Create
        lib.js file at lib_resource/static/src/js.

        Note : Now most important rule to remember. inside lib.js you need to create openerp new namespace lib_resource.
       
        openerp.lib_resource = function(openerp)
        {
            var myTemplate  =  ’link’,   // template for qweb rendering … we can manage it as per our requirement.
            Here you can create new function or global variables.
            Also if you want to modify or inherit any existing class or libs the  here you can manage that.
            Here you can inherit any existing class and modify its operation and also able to create new classes…
        }

--> lib.xml  [ at ] lib_resource/static/src/xml

 This file holds information regarding qweb template’s.
What is qweb???
when we try to load the page then templates render on qweb.js and qweb2.js
these 2 files are containing all the information well i also do not know deeply about this because we have never try to know that thing.
meanly it is used for loading the templates for different views
 example :
   
    <?xml version=”1.0″ encoding=”UTF-8″?>
   
    <templates id=”link1” xml:space=”preserve”>   
        <t t-name=”link”>
            <div>………………… manage your template……………    </div>
        </t>   
    </templates>

--> OpenERP Web Module { Level 2 } :
   
    If you want to create new  widget for form.
   
    openerp.lib = function(openerp)
    {
        openerp.web.form.<class name> = openerp.web.form.<class name>.extend({
            ….. manage your code …..
        });
    }

For getting more grips on it review all most web addons in side server addons folders.

Note : ( Remember )
    OpenERP have main important files are located at :
    -->addons/web/static/src/js :-
        Here all js are main core js and on this other openerp javascript depended.
       
        boot.js, core.js, crome.js and data.js files are the heart of openerp framework.
        Where view_form.js, view_page.js and view_list.js are also most important to render list view and form views.
        Also all other files in this same directory are most important files.
       
        OpenERP have user jqeury differed all most in code. So need to grip on it too.
       
        addons/web/static/src/xml :- base.xml

------>>>>
This file hold all most all presentation view related templates.

Monday, 16 April 2012

Test Cases in OpenERP


-
  Check that Resource is in "draft" state.
-
  !assert {model: lib.register, id: register_001,string: Resource should be Available.}:
    - state == 'draft'
-
  I want to issue one book.
-
  !python {model: lib.register}: |
    self.registration_confirm(cr, uid, [ref("register_001")])
-
  I Check that Resource is "Issued"
-
  !assert {model: lib.register, id: register_001, string: Resource should be issued}:
    - state == 'issue'
-
  Return time, I close this Resource.
-
  !python {model: lib.register}: |
    self.button_reg_close(cr, uid, [ref("register_001")])
-
  Check that resource is in "close" state.
-
  !assert {model: lib.register, id: register_001, string: Resource should be Closed}:
    - state == 'close'

Tuesday, 10 April 2012

How to Generate Report in OpenERP


Generate Report : Tiny ERP Gandhinagar...
                                                     By : Year – 2012 Trainee at Tiny ERP
                                            Pinakin Nayi ( nayi_pinakin@yahoo.in )

step 1 :
→ open open-office.org
→ tools menu
→ extension manager
→ go to - base_report_designer
→ plugin →openerp_report_designer.zip

step 2 :
→ restart open-office

step 3 :
→ open a new report
→ add a loop ( select your DB)
→ add loop as a repeat
→ add a field and make it customize look
→ save file as a .sxw or send to the server

step 4 :
→ convert .sxw to .rml
→ $> cd to base-report-designer/openerp_sxw2rml > python openerp_sxw2rml.py
../../exam/report/.sxw > ../../exam/report/.rml

step 5 :
→ ( in report folder )
→ exam.py or copy it from (http://doc.openerp.com/v6.0/developer/3_11_reports/11_1_openoffice_report.html)
import time
from report import report_sxw
class exam(report_sxw.rml_parse):
def __init__(self, cr, uid, name, context):
super(exam, self).__init__(cr, uid, name, context)
self.localcontext.update({
'time': time,
})
report_sxw.report_sxw('report.exam.student', 'exam.student',
'addons/exam/report/exam.rml', parser=exam, header=True)

→ (exam.py , exam.rml , exam.sxw , __init__.py )
→ __init__.py
import exam


step 6 :
( main exam folder )
→ exam_report.xml
<?xml version="1.0"?>
<openerp>
<data>
<report
id="exam_student"
string="Print Exam..."
model="exam.student"
name="exam.student"
rml="exam/report/exam.rml"
auto="False"
header="False"/>
</data>
</openerp>

→ __openerp__.py
in update → 'exam_report.xml'

→ __init__.py
import report

Friday, 6 April 2012

How to Connect to PC using Wireless


How to connect two PC using wireless …
---------------------------------------------
                               By: Pinakin Nayi
                              nayi.pinakin@gmail.com
                                              ( M.C.A)
Instructions
Things You'll Need:
  • Wireless router
  • Computers with wireless cards
Connect Computers to the Wireless Network
1.    1
Click the "Start" button, click "Connect To" on the "Start" menu, then choose "Wireless Network Connection."
2.    2
Review the list of wireless connections in the Wireless Network Connection window, select your network and click the "Connect" button.
3.    3
Enter your security pass phrase if you have set up wireless security on your network.
4.    4
Allow your computer make a connection to your wireless network.
5.    5
Place a check in the "Save This Network" and "Start This Connection Automatically" boxes. This will allow your computers to save the network settings and automatically connect to this network in the future.
6.    6
Repeat the process on the second computer. Now both computers will be wirelessly networked to the same router.
Creating a Shared Folder in Windows XP
7.    1
Locate the folder that you want to share with the other computer.
8.    2
Right-click on the folder and select "Sharing and Security" from the menu.
9.    3
Place a check next to "Share This Folder on the Network." If you wish for the users on the other computer to have full access to all files in the folder, place a check in the "Allow Network Users to Change My Files" box.
10. 4
Click the "Apply" button, then the "OK" button to allow changes to take place. This folder and all of the files inside will now be shared with the other computers on the wireless network.
11. 5
Repeat steps 1 through 4 to create a shared folder on the second computer.
Creating a Shared Folder in Windows 7 and Vista
12. 1
Locate the folder that you want to share with the other computer.
13. 2
Right-click on the folder and select "Properties" from the menu and navigate to the "Sharing" tab.
14. 3
Click the "Advanced Sharing" button.
15. 4
Place a check in the "Share This Folder" box.
16. 5
Click the "Permissions" button. To allow users on the other computer to have full access to all files in the folder, place a check in the "Full Control" box in the "Allow" column.
17. 6
Click the "Apply" button, then the "OK" button twice to allow changes to take place. This folder and all of the files inside will now be shared with the other computers on the wireless network.
18. 7
Follow steps 1 through 6 to create a shared folder on both computers.
Finding Shared Folders on a Network
19. 1
Double-click the "Network" or "My Network Places" icon on your desktop. Windows XP users will see a list of folders that are shared. Windows 7 and Vista users will see a list of computer names that are connected to the network.
20. 2
Double-click on the computer name or folder from which you wish to retrieve files.
21. 3
Access the files inside the shared folder. Depending on the permissions you set when you created the shared folder, you may be able to drop new files in the folder, move files out of the folder, edit and delete the files as if they were on your own computer.