Tuesday, 15 October 2013

Set reply to in OpenERP


How to set reply to in OpenERP ?

I think you all are searching about how to use reply-to in OpenERP 7.0 ?

If we are about to set mail configuration of any company than there is mail alias in picture we already talked about mail alias as how to set and configure mail alias and how it works.
Mail Alias in OpenERP

But, the problem when we send a mail to any customer and if customer reply to that mail at that time there may be chances to loose
mail so we need to configure reply to proper so whenever customer reply than it will take the reply to mail.

so, there are two ways either we hard code for reply to and another way little bit hacking like set defaults from web UI .

Here, i defined some steps so admin can easily configure default.

1. Just login with admin user.
2. Activate developer mode .


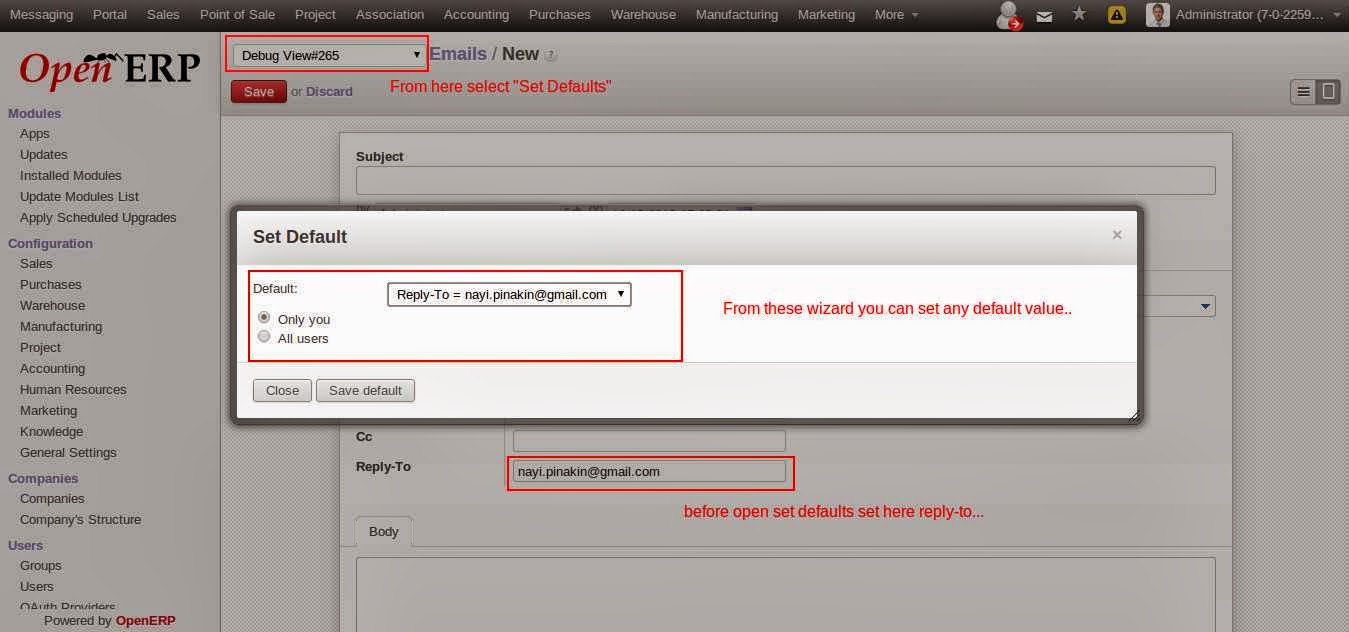
3. Now, go to mails and create a new mail and set reply to any mail you want to set in reply to.


4. open debug mode and select "Set Defaults" so it will open one dialog from that select reply to = XXXXX and set as per requirement for all users or only one.

Now, You can test there is reply to added in mail....


.. Enjoy ..

Friday, 13 September 2013

Only Tax invoice with OpenERP


Today , concern about how to create any invoice with only tax amount.

In real business sometimes its needed to create invoice where there is no any products but only vat or any tax.

Ex. Suppose in shipping company which contain an invoice line relating to import VAT. That means that the VAT amount is not a fixed percentage of the invoice.

So, how we can enter supplier invoice ?

Here are some steps that may be useful to you.

1. Set up Tax through(Accounting > Configuration > Tax).
    And in it just set tax type to "Python code"
    And set as follow(in result just assign price_unit direct no need to multiply).
Python Code
# price_unit
# product: product.product object or None
# partner: res.partner object or None

result = price_unit
Python Code (reverse)
# price_unit
# product: product.product object or False

result = price_unit
And just tick "Tax included in price" (so it consider as the tax already included in price).
2. Now, its time to create a new product named like "VAT" service type.
    Under the Accounting tab in product add supplier Taxes to be the created tax.
3. Now, create a supplier invoice and in it select created product VAT, and you can edit unit price and set it as per requirement. 
  So, you can see the whole amount treat as tax and you can validate invoice.

Why we have to go through this process ?? Because in OpenERP will not allow you to create any invoice without invoice line.

Hope this will help to you.

..Enjoy..

Tuesday, 10 September 2013

Dynamically view in OpenERP


Creating Views Dynamically in OpenERP


Create dynamic view in OpenERP

Sometimes, its needed to add or remove or edit some properties of fields in dynamic mode. Normally, we can manage view from xml.

So, in OpenERP there is fields_view_get() method in which we can divert view or do some operation.

Another thing some times its needed to redirect depending on state or else.

Example : 

Case 1 : We have two form view parent and child, now from the tree view on the basis of state we have to call either parent or child.
       
          def fields_view_get(self, cr, uid, view_id=None, view_type=False, context=None, toolbar=False, submenu=False):      
              if view_type == 'form':
                  if state == 'A' :
                      view_id = self.pool.get('ir.ui.view').search(cr,uid,[('name', '=', 'parent.form')])
                  elif state == 'B':
                      view_id = self.pool.get('ir.ui.view').search(cr,uid,[('name', '=', 'child.form')])
              res = super(my_module,self).fields_view_get(cr, uid, view_id=view_id, view_type=view_type, context=context, toolbar=toolbar, submenu=submenu)


Case 2 : We have to change some fields using fields_view_get()

     def fields_view_get(self, cr, uid, view_id=None, view_type='form', context=None, toolbar=False, submenu=False):
        if context is None:
            context = {}
        res = super(account_invoice_line,self).fields_view_get(cr, uid, view_id=view_id, view_type=view_type, context=context, toolbar=toolbar, submenu=submenu)
        if context.get('type', False):
            doc = etree.XML(res['arch'])
            for node in doc.xpath("//field[@name='product_id']"):
                if context['type'] in ('in_invoice', 'in_refund'):
                    node.set('domain', "[('purchase_ok', '=', True)]")
                else:
                    node.set('domain', "[('sale_ok', '=', True)]")
            res['arch'] = etree.tostring(doc)
        return res


..Enjoy..

Friday, 23 August 2013

Configure Proxy server


Configure Proxy server

Configuration Ubuntu :
(Three Steps to configure proxy server)

Go etc -> apache2 -> sites-available

    <VirtualHost *:80>
        ServerName pinakin
        ServerAdmin webmaster@localhost

         <Proxy *>
                Order deny,allow
                Allow from all
        </Proxy>
        ProxyRequests Off
        ProxyPass / http://localhost:8069/
        ProxyPassReverse / http://localhost:8069/
        #ProxyHTMLURLMap / http://localhost:8069/ /http://pinakin/

        ErrorLog /var/log/apache2/webclient-error.log
        CustomLog /var/log/apache2/webclient-access.log combined
    </VirtualHost>


Step 1 : Install Apache 2
   
      -  $ sudo apt-get install apache2
                 [sudo] password for tiny:
                 Reading package lists... Done
                 Building dependency tree    
                 Reading state information... Done
                 apache2 is already the newest version.
                 The following packages were automatically installed and are no longer required:
                 appmenu-gtk linux-headers-2.6.35-22 linux-headers-2.6.35-22-generic libxdot4
                 Use 'apt-get autoremove' to remove them.
                 0 upgraded, 0 newly installed, 0 to remove and 189 not upgraded.

Step 2 : Give permission to edit and enable module proxy, header or etc

     -  $ sudo chmod 777 /etc/apache2/sites-available/pinakin
   
     -  $ sudo a2enmod headers
               Enabling module headers.
               Run '/etc/init.d/apache2 restart' to activate new configuration!
     -  $ sudo a2enmod proxy
               Enabling module proxy.
               Run '/etc/init.d/apache2 restart' to activate new configuration!
     -  $ sudo a2enmod proxy_connect
               Considering dependency proxy for proxy_connect:
               Module proxy already enabled
               Enabling module proxy_connect.
               Run '/etc/init.d/apache2 restart' to activate new configuration!
     -  $ sudo a2enmod proxy_ftp
               Considering dependency proxy for proxy_ftp:
               Module proxy already enabled
               Enabling module proxy_ftp.
               Run '/etc/init.d/apache2 restart' to activate new configuration!
     -  $ sudo a2enmod proxy_http
              Considering dependency proxy for proxy_http:
              Module proxy already enabled
              Enabling module proxy_http.
              Run '/etc/init.d/apache2 restart' to activate new configuration!
     -  $ sudo a2enmod ssl
              Enabling module ssl.
              See /usr/share/doc/apache2.2-common/README.Debian.gz on how to configure SSL and
              create self-signed certificates.
              Run '/etc/init.d/apache2 restart' to activate new configuration!
     -  $ sudo a2ensite default-ssl
              Enabling site default-ssl.
              Run '/etc/init.d/apache2 reload' to activate new configuration!
     -  $ sudo a2dissite
              000-default  default-ssl
     -  $ sudo a2dissite 000-default
              Site default disabled.
              Run '/etc/init.d/apache2 reload' to activate new configuration!
     -  $ sudo a2ensite endicus
              Enabling site endicus.
              Run '/etc/init.d/apache2 reload' to activate new configuration!
     -  $ sudo /etc/init.d/apache2 restart
             \Syntax error on line 12 of /etc/apache2/sites-enabled/endicus:
              Invalid command 'ProxyHTMLURLMap', perhaps misspelled or defined by a module not
              included in the server configuration
     -  $ sudo /etc/init.d/apache2 restart
             Syntax error on line 12 of /etc/apache2/sites-enabled/endicus:
             Invalid command 'ProxyHTMLURLMap', perhaps misspelled or defined by a module not                      included in the server configuration
     -  $ sudo /etc/init.d/apache2 restart
             * Restarting web server apache2              
            waiting
            [ OK ]

Step 3 : To show list of hosts available

     -   $ sudo nano /etc/hosts
              [sudo] password for tiny:


127.0.0.1       localhost.localdomain   localhost
::1     test    localhost6.localdomain6 localhost6
127.0.1.1       test
127.0.0.1       pinakin
127.0.0.1       v6
127.0.0.1       v7


..Enjoy..

Thursday, 15 August 2013

Work with analytic Distribution in OpenERP


Analytic Distribution

Analytic Distribution is mainly used for spreading/dividing your expense/income in various analytic account (i.e. cost account) in OpenERP.
Work with analytic Distribution in OpenERP

There are various application of analytic distribution in real business case.
Let's take one business case in which a company wants to distribute it's income between various departments:
A IT company provide consultancy services for the software solution.
The company is interested to divide it's income real-time between it's main three departments 

1. Analysis and Design 2. Coding and testing 3. Deployment.

It also wants that when customer invoice is created for particular client PROJECT, the invoice amount will be divide in these three departments as below:

1. Analysis and Design: 50%
2. Coding and testing : 30%
3. Deployment : 20%
You can easily configure this requirement in OpenERP using Analytic Distribution.
Just create three analytic account (Analysis and Design a/c, Coding and testing a/c, Deployment a/c). Make sure that the parent account of these accounts is the client project's analytic account.
Now configure Analytic Distribution by adding these three analytic accounts with their respective part in percentage.
Add this analytic distribution at the time of encoding customer invoice line.
Now validate that invoice and check the "Analytic Chart of Account" in order to check the effect of Analytic Distribution.


..Enjoy..

Monday, 22 July 2013

Unable to create lead from email


Hello All,

I think you all are facing problem of lead/helpdesk. As its not created automatically mail.

You have configured your mail server correctly action to create lead correctly set but still all
mail are not fectched or all mails are not create lead/helpdesk right ?

Some mails create messages instead of new lead ?

So, there may be chances you have configured mail server thats silently broken.

So, avoid this kind of stuff you can just check your mail server and check your aliases both are same , means here i give you example.

in your mail server : nayi.pinakin@gmail.com for fetching incoming mail.

now in your users if there is similar 'nayi.pinakin' than its create problem.

So, check your aliases and be sure there is fetch mail server and user are not same.

..Enjoy..

Sunday, 14 July 2013

Google Alert


Do you know google alert ?

When you are about to search something but there is no any related document still published ,
in this case you can create google alert that will alert you if there is similar like document on web.

What a fantastic facility by Google !!!


So, what we say  "Thanks Google !!"

http://www.google.co.in/alerts/


View Pinakin Nayi's profile on LinkedIn